|
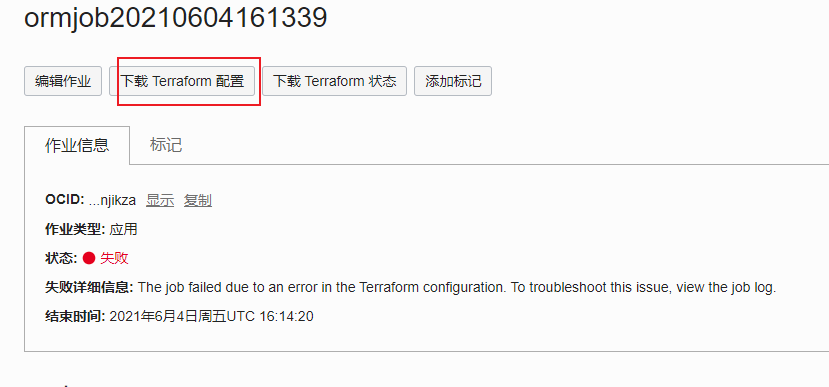
甲骨文 ARM,大家都用了有阵子了,总结起来就是两个字“真香”,不过日本和韩国因为涌入的mjj太多,线路已经不堪重负。特别是韩国区,线路boom已经是常态了。 因为一机难求,所以大家都用上了脚本,又因为用脚本的人太多,有很多刷机的童鞋收到了警告的邮件,这就很矛盾了,如果你不刷,是肯定抢不到机器的,但是刷了,又怕被警告,进而有封号的风险。唯一比较稳妥的方法就是你把时间调整的稍微长一点,这样可能会好点。不过也有的mjj逆向思维,大家都不敢刷,我依然逆风而行继续刷,所以很开森的抢到了arm。 这篇文章就来继续分享一个利用宝塔搭建的甲骨文 ARM 刷机脚本! 一、生成main.tf1、创建实例,创建的时候我们选择系统:ubuntu20(不能选带后缀的精简版),VM.Standard.A1.Flex:4C 24G,硬盘:100G,并粘贴密匙。这个过程跟我们正常创建实例是一样。 在所有信息都填写完毕后,选择 另存为堆栈 。堆栈信息、配置变量,全都默认;复查,选中下方的“运行”。最后点击创建,堆栈会自动运行一次。

2、我们点击下载 Terraform 配置,会得到一个压缩包。解压后,会有main.tf,用记事本打开,里面的信息就是我们后面需要用到的。
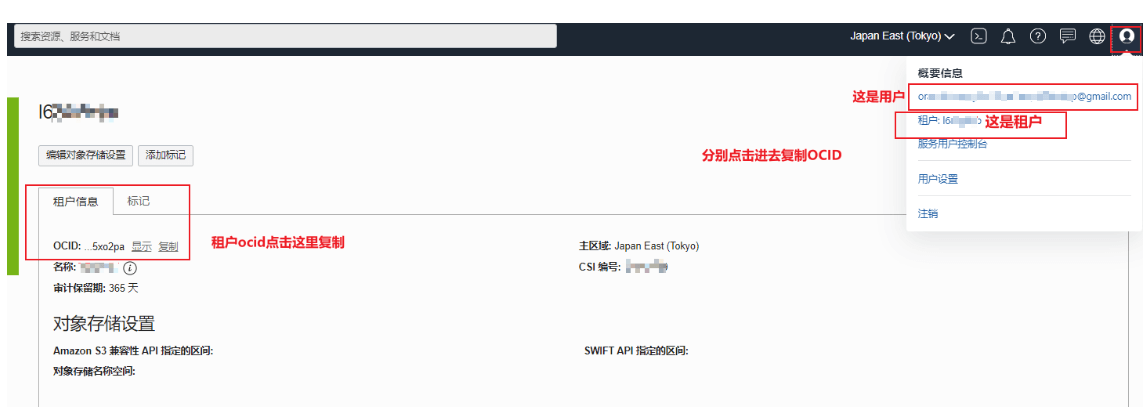
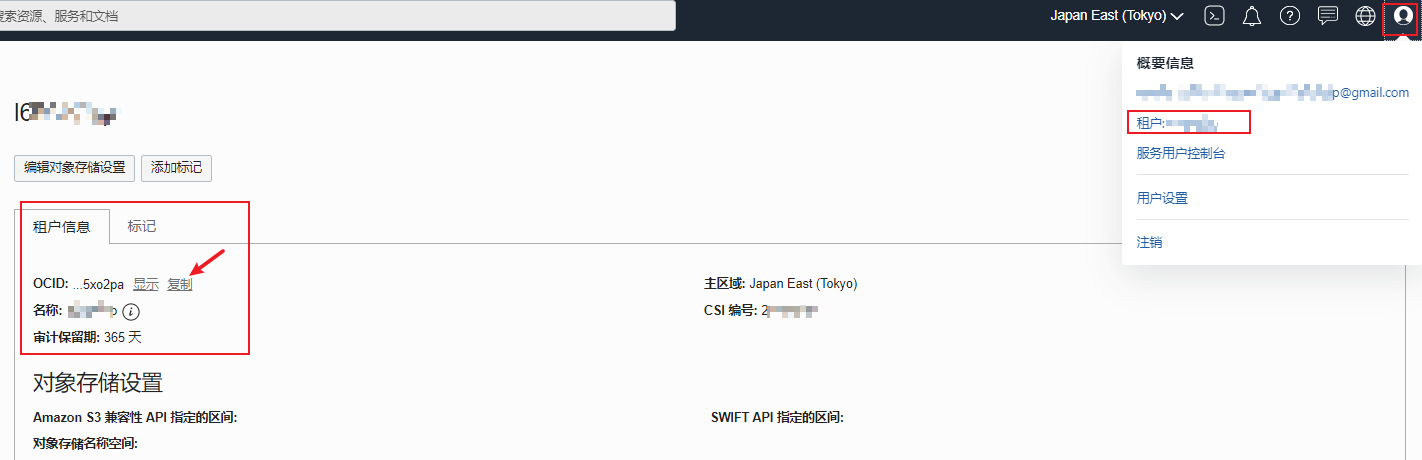
二、查找并复制租户和用户的ocid甲骨文后台右上角>>用户设置>>分别点击用户和租户,在信息栏中有我们需要的ID,分别点击复制,可以保存在记事本备份好。具体看图:
三、安装oci命令行管理工具bash -c "$(curl –L https://raw.githubusercontent.co ... /install/install.sh)"
一路回车即可,默认安装在/root/bin目录。 当出现“===> Modify profile to update your $PATH and enable shell/tab completion now? (Y/n):”这个时候,是在提示你输入y回车,会自动帮你添加环境变量。之后又是一路回车,出现如下提示表示安装成功。 ===> Modify profile to update your $PATH and enable shell/tab completion now? (Y/n): y===> Enter a path to an rc file to update (file will be created if it does not exist) (leave blank to use '/root/.bashrc'):-- Backed up '/root/.bashrc' to '/root/.bashrc.backup'-- Tab completion set up complete.-- If tab completion is not activated, verify that '/root/.bashrc' is sourced by your shell.---- ** Run `exec -l $SHELL` to restart your shell. **---- Installation successful.-- Run the CLI with /root/bin/oci --help
使用下面命令查看安装是否成功 oci -v
如果返回信息显示没有找到 oci ,那是因为安装后,变量不会立即反映出来,所以我们重新加载一下 exec -l $SHELL
然后再次检查,即可显示正确版本号。 四、配置cli1、输入如下代码开始配置,配置的路径默认在root目录 oci setup config
2、具体配置看下面 Enter a location for your config [/root/.oci/config]:Enter a user OCID: #输入你的用户ocidEnter a tenancy OCID: #输入你租户的用户idEnter a region by index or name(e.g.1: ap-chiyoda-1, 2: ap-chuncheon-1, 3: ap-hyderabad-1, 4: ap-melbourne-1, 5: ap-mumbai-1,6: ap-osaka-1, 7: ap-seoul-1, 8: ap-sydney-1, 9: ap-tokyo-1, 10: ca-montreal-1,11: ca-toronto-1, 12: eu-amsterdam-1, 13: eu-frankfurt-1, 14: eu-zurich-1, 15: me-dubai-1,16: me-jeddah-1, 17: sa-santiago-1, 18: sa-saopaulo-1, 19: uk-cardiff-1, 20: uk-gov-cardiff-1,21: uk-gov-london-1, 22: uk-london-1, 23: us-ashburn-1, 24: us-gov-ashburn-1, 25: us-gov-chicago-1,26: us-gov-phoenix-1, 27: us-langley-1, 28: us-luke-1, 29: us-phoenix-1, 30: us-sanjose-1): #这里选择区域Do you want to generate a new API Signing RSA key pair? (If you decline you will be asked to supply the path to an existing key.) [Y/n]: y #输入yEnter a directory for your keys to be created [/root/.oci]:Enter a name for your key [oci_api_key] ublic key written to: /root/.oci/oci_api_key_public.pemEnter a passphrase for your private key (empty for no passphrase)rivate key written to: /root/.oci/oci_api_key.pemFingerprint:Config written to /root/.oci/configIf you haven't already uploaded your API Signing public key through the console, follow the instructions on the page linked below in the section 'How to upload the public key': https://docs.cloud.oracle.com/Co ... signingkey.htm#How2 ublic key written to: /root/.oci/oci_api_key_public.pemEnter a passphrase for your private key (empty for no passphrase)rivate key written to: /root/.oci/oci_api_key.pemFingerprint:Config written to /root/.oci/configIf you haven't already uploaded your API Signing public key through the console, follow the instructions on the page linked below in the section 'How to upload the public key': https://docs.cloud.oracle.com/Co ... signingkey.htm#How2
3、复制生成的公钥 cat /root/.oci/oci_api_key_public.pem
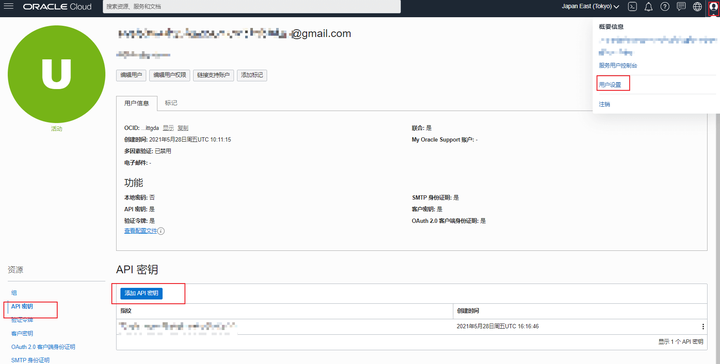
4、把展示出来的内容复制下来。并且添加到,甲骨文后台=>用户设置>>资源>>API秘钥>>添加API秘钥
5、检查oci配置是否正确 oci iam availability-domain list
如果这样提示表示配置正确,如果不是,检查你前面的配置 [root@host63c0dcac37 ~]# oci iam availability-domain list{"data": [{"compartment-id": "ocid1.tenancy.oc1..aaaaaaaauoxxxxxxxxxxxxx","id": "ocid1.availabilitydomain.oc1..aaaaaaaaaixxxxxxxxxxxxx","name": "uffff:AP-TOKYO-1-AD-1"}]}
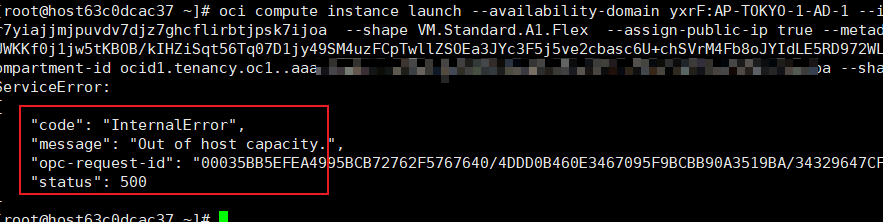
五、用oci申请开通ARM1、运行命令的脚本如下: oci compute instance launch --availability-domain yxrF:AP-TOKYO-1-AD-1 --image-id ocid1.image.oc1.ap-seoul-1.aaaaaaaa..... --subnet-id ocid1.subnet.oc1.ap-seoul-1.aaaaaaaa..... --shape VM.Standard.A1.Flex --assign-public-ip true --metadata '{"ssh_authorized_keys": "ssh-rsa xxxxxxxxxxxxxxxxx填你自己的"}' --compartment-id ocid1.tenancy.oc1..aaaaaaaa...... --shape-config '{"ocpus":4,"memory_in_gbs":24,"boot_volume_size_in_gbs":100}'
具体的解释如下: - availabilityDomain:可用性域 我的是日本(yxrF:AP-TOKYO-1-AD-1)
- compartmentId:tenancyOCID
- assignPublicIp:公网IP true
- subnetId:子网
- displayName:实例名,根据自己的main.tf里面的信息填写。
- ssh_authorized_keys :秘钥,需要填写你自己的
- shape 实例配置 ARM:”VM.Standard.A1.Flex”
- shape-config:机器配置
- imageId: “ocid1.iAP-TOKYO-1-AD-11.aaaaaaaar……….”
上面这些信息,我们在第一步生成的main.tf中全部可以找到。 2、先试运行一次脚本,以上的修改好后,全部复制回车运行,显示如下提示表示配置正确。
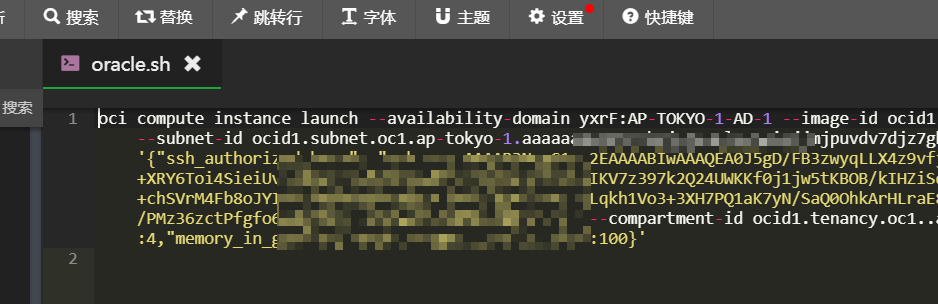
3、先将一长串的oci命令写到/root/oracle.sh中,如果是用的宝塔那么直接在目录下面新建一个oracle.sh,然后复制那一串代码粘贴保存即可。
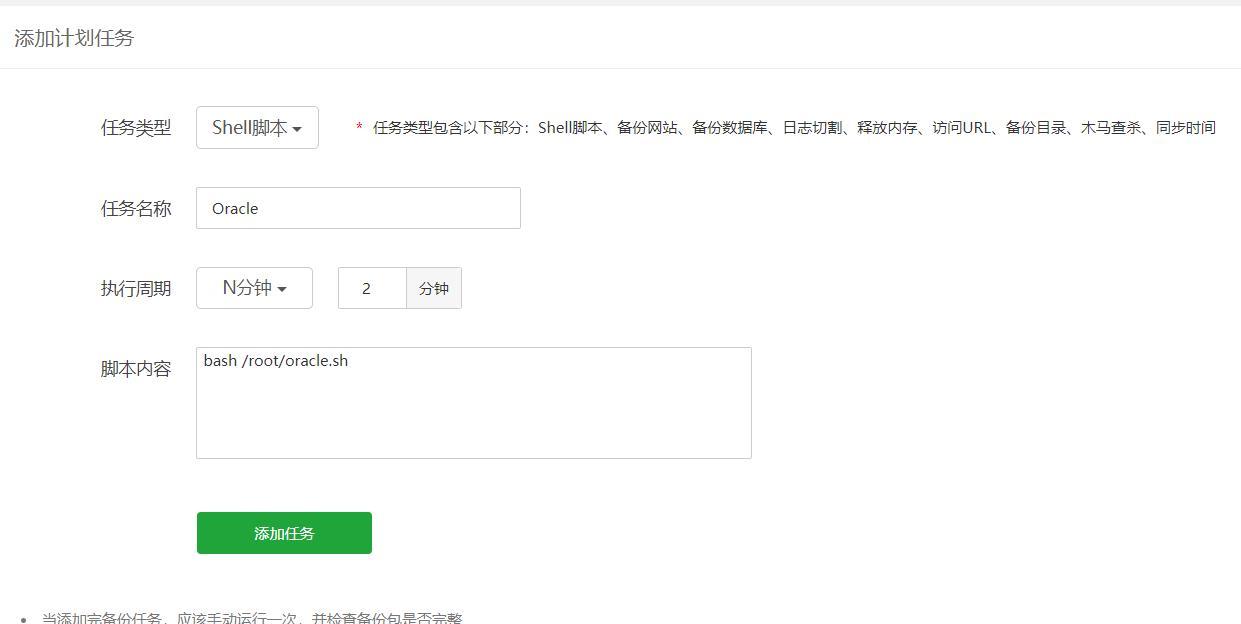
4、宝塔计划任务设置执行: - 执行周期:2-3分钟一次(设置的时间越短,可能越容易触发警告,但设置的时间过长,会不容易刷到。这个自己把握!)
- 脚本内容:bash /root/oracle.sh
执行效果,可以查看日志。 我们现在要做的就是等待好运降临了!
| 

 发表于 2022-1-9 12:11:38